since we're having lots of members wanting to lower they're car's lately, it can also go in the genaral section or where ever you feel it should go.:thumbsup:
Heres a "copy and Paste" instructions that I had writing out for a fellow member on another forum about a year ago, and also did this same for several other members on different forum's so here you go, and I hope this will help you out, some of you with older C-4's will have to buy 1 1/2 inch wheel spacers and these instructions are for C-5 owners as well:thumbsup: ........
It's so easy to do! Infact, the hardest thing to do is to cut the rubber off the spring.. that stuff on there is tuff!!
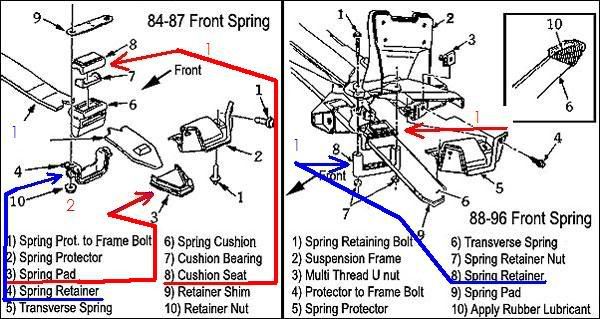
Unbolt the outer tie rod & sway bar, on both sides, losen the spring retainers which is holding the leaf spring to the frame of the car. (blue arrow in picture below)
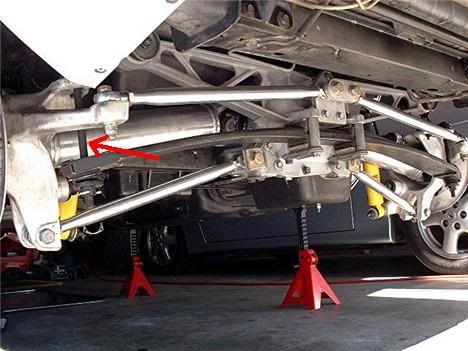
On either side that you what to start on first, get a block of wood ( 2 by 4 ) and a small floor jack will be fine, put the wood along with the jack under the spring closest to the a-arm, with out it being ON the a-arm it's self and slowly jack the spring up untill it's not resting on the lower a-arm ( about a 1/4 to an 1/2 inch off )
Disconect the ABS sensor thats located on the brake assembly, thats very important for you to do so!! ( if yours has one) remove the 2 bolts that are holding the shocks to the lower a-arm (they're located near the spring in the lower a-arm), unbolt the lower ball joint stud nut, you can use a two jaw puller or what I did was unscrew the nut untill it covered the end of the stud and with a hammer, tap on the top of the nut and not that hard or you'll ruin either the nut it's self or the stud or both. (try using a hard rubber mallet first)
Before doing this, find something to put under the wheel hub.. another block of wood would be fine just to stabilize it and it should come free with no problem!!
repeat this on the other side and let the presure off from the 2 by 4 and jack free and you should be able to slide the spring out from either side after you pull back at the wheel hub away little, the spring will slide out from the lower a-arm.
It will not come out all the way if the car is not jacked up high enough and it does not have to!! you just need to be able to slide the spring far enough to be able to reach the rubber mounts.
With a steak knife or I prefered a hack saw blade, saw off the rubber mounts (#1 arrows in picture's) and try not to cut into the spring it's self... take your time, don't rush!!.
Do this on both sides.
![Image]()
(Helpfull hint: while cutting the rubber off, lift up on the side that you started cutting at, at the same time you cutting away, the reason is that if you dont do this, the rubber will grab onto the knife/sawblade and you'll make very slow progress if any at all. The first side that I did without doing this took me about an hr and a half to cut, untill I lifted the rubber up off the blade thats sliding back and forth, the other side took 10 min to complete the job, big difference.)
This will give you the drop that your, I think looking for!!!
The wheels will be, depending on what size rims you've got, if your running stock 17's will be about an 1 inch to an 1 1/4 from the fender wells, and if you want an altamite drop on your car, take out the lowering screw's (if you own a C-5) shave off those rubber bushing's that your leaf spring sit's on in the a-arm!! (#2 red arrow in left hand pic) for a maximuim drop NO!! THE TIRE'S WILL NOT RUB!!
![Image]()
For the Rear end, take out the stock bolt's (Red arrow) and replace them with 12 inch bolts, buy some extra washers as well because you'll need them to be able to adjust the height by using them as shims.
Jack up the car, place a jack stand underneath some where stable, once the car is up in the air place your jack underneath the leaf spring with a block of wood between them (Jack and spring) to protect the spring, this will release the tention on the spring and bolt, unscrew the nut, and replace with the longer one, if you need washers on either one of the bolts the washers will go on before threading the bolt back through the the assembly, thats it plan and simple.
You will have to of course hopefully with out saying, take the wheels off to do this job, and the ride is fine, just a little more stiff, and I do mean a little.
A wheel alignment will have to be done but you dont have to go right away but evntualy it willhave to be done.
I hope this helps out all whos been wanting to lower they're car's .
Aloha
![Image]()
Heres a "copy and Paste" instructions that I had writing out for a fellow member on another forum about a year ago, and also did this same for several other members on different forum's so here you go, and I hope this will help you out, some of you with older C-4's will have to buy 1 1/2 inch wheel spacers and these instructions are for C-5 owners as well:thumbsup: ........
It's so easy to do! Infact, the hardest thing to do is to cut the rubber off the spring.. that stuff on there is tuff!!
Unbolt the outer tie rod & sway bar, on both sides, losen the spring retainers which is holding the leaf spring to the frame of the car. (blue arrow in picture below)
On either side that you what to start on first, get a block of wood ( 2 by 4 ) and a small floor jack will be fine, put the wood along with the jack under the spring closest to the a-arm, with out it being ON the a-arm it's self and slowly jack the spring up untill it's not resting on the lower a-arm ( about a 1/4 to an 1/2 inch off )
Disconect the ABS sensor thats located on the brake assembly, thats very important for you to do so!! ( if yours has one) remove the 2 bolts that are holding the shocks to the lower a-arm (they're located near the spring in the lower a-arm), unbolt the lower ball joint stud nut, you can use a two jaw puller or what I did was unscrew the nut untill it covered the end of the stud and with a hammer, tap on the top of the nut and not that hard or you'll ruin either the nut it's self or the stud or both. (try using a hard rubber mallet first)
Before doing this, find something to put under the wheel hub.. another block of wood would be fine just to stabilize it and it should come free with no problem!!
repeat this on the other side and let the presure off from the 2 by 4 and jack free and you should be able to slide the spring out from either side after you pull back at the wheel hub away little, the spring will slide out from the lower a-arm.
It will not come out all the way if the car is not jacked up high enough and it does not have to!! you just need to be able to slide the spring far enough to be able to reach the rubber mounts.
With a steak knife or I prefered a hack saw blade, saw off the rubber mounts (#1 arrows in picture's) and try not to cut into the spring it's self... take your time, don't rush!!.
Do this on both sides.
(Helpfull hint: while cutting the rubber off, lift up on the side that you started cutting at, at the same time you cutting away, the reason is that if you dont do this, the rubber will grab onto the knife/sawblade and you'll make very slow progress if any at all. The first side that I did without doing this took me about an hr and a half to cut, untill I lifted the rubber up off the blade thats sliding back and forth, the other side took 10 min to complete the job, big difference.)
This will give you the drop that your, I think looking for!!!
The wheels will be, depending on what size rims you've got, if your running stock 17's will be about an 1 inch to an 1 1/4 from the fender wells, and if you want an altamite drop on your car, take out the lowering screw's (if you own a C-5) shave off those rubber bushing's that your leaf spring sit's on in the a-arm!! (#2 red arrow in left hand pic) for a maximuim drop NO!! THE TIRE'S WILL NOT RUB!!
For the Rear end, take out the stock bolt's (Red arrow) and replace them with 12 inch bolts, buy some extra washers as well because you'll need them to be able to adjust the height by using them as shims.
Jack up the car, place a jack stand underneath some where stable, once the car is up in the air place your jack underneath the leaf spring with a block of wood between them (Jack and spring) to protect the spring, this will release the tention on the spring and bolt, unscrew the nut, and replace with the longer one, if you need washers on either one of the bolts the washers will go on before threading the bolt back through the the assembly, thats it plan and simple.
You will have to of course hopefully with out saying, take the wheels off to do this job, and the ride is fine, just a little more stiff, and I do mean a little.
A wheel alignment will have to be done but you dont have to go right away but evntualy it willhave to be done.
I hope this helps out all whos been wanting to lower they're car's .
Aloha